September 14, 2012

Shoe Revamp: Comic Book Shoes

WHAT YOU NEED:

Mod Podge, Shoes, Paintbrush, Comic book, Scissors, Newspaper or cardboard

 WHAT TO DO:

1.  Cut out your favourite scenes from your comic book.  Position them where you would like them to go on your shoes, and then cover the back of the picture with Mod Podge.
2.  Paste the comic book clipping onto the shoe, and press it down so it is smooth.
3.  Trim off any excess clipping, or fold it over the edge of the shoe.
4.  Put a layer of Mod Podge over the comic book clipping.
5.  Continue this process until the shoes are completely covered with comic strips.
6.  Once the Mod Podge has dried, apply three more layers (letting each layer dry before starting the next).

Note: This is a time consuming project.  Give yourself at least an hour and a half for each shoe.

All photos are not mine. They are from psheart.blogspot.ca. Credits to the owner.
You can see the original post here.

PLEASE FOLLOW ME ON TWITTER  AND LOOKBOOK ♥

September 12, 2012

August- September 2012 Photo Dump

I noticed that I have so much photos uploaded on my Facebook and Twitter account (If you haven't yet, please follow me, I'm begging you! lol). It is usually the daily update of my life or the things that I tripped to take a photo of. Taking pictures has been my habit and doing so is what I am just capable to do with my busy schedule since I recently got a job. Taking picture is the new blogging! I decided to post it here for the reason that I don't have an Instagram account since I don't own an iPhone, plus, I thought these photos is worth sharing here since this isn't really a blog about my personal life but a fashion slash beauty blog. Don't worry, I choose those that are worth sharing. How I wish that would be fine. Yay!

My current nails in Ash Gray. Neutral mode.
My Pinky and Glittery nails. Kikay!
New in my things: OMG nail colors in White out and Bikini, Klik nail polish in Platinum Glitter and Ashley and LDS Bear Coin Purse that I super-super love! ♥  
My first nail art ever! Shallow happiness? Maybe. I'm just proud! :)
New in my accessories: Color burst!
Nail polish I've borrowed from Ate Enei. Poor me can't afford to have them!
Arm party! Violet and Turquoise! Yay!
DIY Arm candy by me. Another proud creation, another shallow happiness. I just can't stop myself! Please bear with me. :)
My take on fishtail braid. This photo has so much in it! A fishtail braid, a pink nail, a silly face, and a shirt in violet which is the color to die for!
Unrelated picture? Sorry! They're my office snack :)
My lovely bear coin purse which I've told you I really love and my Ash gray nail. Taken from my table at the office.
New hair products to try for my dry and frizzy hair! Hope these help!
And that was probably my first photo damp! I may post more soon!
All photos are 100% mine! If you want to see more of these regularly, be sure to follow me on Twitter!

PLEASE FOLLOW ME ON TWITTER  AND LOOKBOOK ♥

September 6, 2012

Revamp your T-shirt

Tired of wearing your t-shirt as it is? This is a new way on how to revamp your simple tee into a striking top! It will just take a couple of minutes to do!

WHAT YOU NEED:

Scissors, Pencil, Ruler, Needle and thread, Piece Ribbon, T-shirt

 STEP 1: Before we start cutting our shirt, we first measured. Measure the length and width of the hull and just think how many strips you want to cut.
STEP 2: My shirt was 55 cm long and I wanted 5 strips, every 11 cm so I put a dot down so I knew where I had to cut.
STEP 3: Decide how long you want each strip. Turn left and then right a point, so you know how far you can cut!
STEP 4: Fold your shirt in half and start cutting. Please make sure the front you do not cut it!
STEP 5: If you've cut, you do not scare if it is not as straight cut. Stretch the tip a bit, this ensures that the cut edges a little curl, now you see not that it's a bit crooked cut.
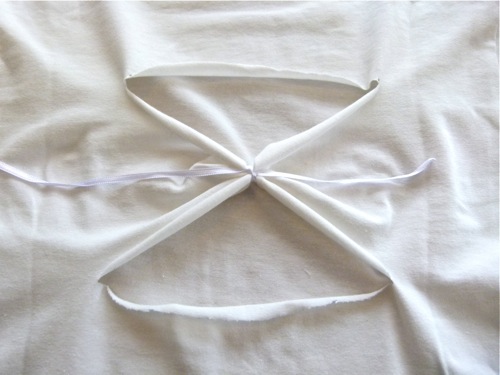
STEP 6: Take a thin ribbon (I have the piece of ribbon from my shirt which cut it in the store on a hanger is hung) and put a loose knot. Now take the ribbon that you will use as decoration. Roll it to the cut strip and determine how long it should be. Cut and sew the ribbon onto each other.
STEP 7: After you have sewn the ribbon, turn the sewn part to back so the pretty side is visible. Sew the ribbon now onto the shirt. Repeat these steps.
Tada! You have turned your boring plain shirt into a striking top! So easy right?

All photos are not mine. Credits to the respective owner.
You can find the original post here.

PLEASE FOLLOW ME ON TWITTER  AND LOOKBOOK ♥